Philippines Blogs

This summer is shaping up to be a hot one, and your air conditioner has probably already been working overtime to keep you and your family cool and comfortable while the sun blazes outside. Over time, however, you may have noticed your energy bill starting to creep up, perhaps accompanied by a decline in air quality. This can be the result of dirty and inefficient AC coils. This is a problem that will only worsen if it isn’t addressed, ultimately necessitating expensive repairs.
Fortunately, learning how to clean AC coils is fairly simple with just a basic understanding of your HVAC system and the right tools for the job. Below, we’ve provided a step-by-step guide to safely removing dirt and debris from evaporator and condenser coils so you can improve the airflow, energy efficiency, and longevity of your system. We’ll also help you determine when it’s time to call a professional so that you can ensure your air conditioning equipment is properly maintained and cared for over the years.
What Are AC Coils?
There are many working parts in every air conditioning system, and those in your system will depend on the type of setup you have. For example, traditional forced-air systems utilize large fans to circulate cooled air through the ductwork of a building, while portable units may simply vent it directly into a room. In either case, the machinery relies on two types of coils to provide cooling: an evaporator coil, which absorbs heat from the air in a building, and a condenser coil, which releases that heat energy safely outside.
How Do AC Coils Get So Dirty?
When your air conditioning operates, air is continuously circulated over the coils, carrying with it dust, dirt, pollen, pet dander, and many other impurities. Over time, these impurities will begin to accumulate on the coils, building up in layers that can ultimately interfere with the transfer of heat energy in the system.
The dirt serves as an insulator, which causes it to cool the surrounding air less efficiently. As a result, the machinery will have to work harder and for longer to provide the same amount of cooling, increasing your energy costs.
Signs of Dirty or Poorly Functioning Coils
There are several signs that may indicate that your AC coils have become too dirty to operate at peak capacity: An increase in your energy bill may be the first thing you notice. You may also notice that the room no longer cools in the way that it once did, as the system is no longer transferring heat energy effectively.
A visual inspection of the coils may reveal a buildup of dust and dirt. If the blockage is severe enough, the coils may even freeze, as the reduced heat energy can lead to their temperature becoming too low.
Cleaning Your Coils
1. Switch Everything Off
Before you can begin the cleaning process, you must make sure the system isn’t running. Turn your air conditioner off at the breaker or disconnect from the power source. If the coils are frozen over, you may need to wait for them to thaw before you can begin the cleaning process.
2. Remove the Outer Casing
The coils are protected by an outer casing, which will need to be removed before you can clean them. Removing the casing to access the coils can be difficult, depending on what type of system you have. Learning how to clean AC coils doesn’t require advanced HVAC repair skills, but you will need to understand the basic parts of your machinery.
If you know where the casing is and can access it easily, you can remove it with a simple screwdriver. However, if you are unable to locate it or it is blocked by wires or other obstructions, you may need to contact an HVAC professional to assist.
3. Remove Any Large Obstructions
The coils might be blocked by larger obstructions, such as leaves and twigs, which you can clear away by hand (wear gloves to ensure safety). These can be a particular problem with the outdoor part of your system, as they can interfere with the cooling process. They can also create a fire hazard if you aren’t diligent about cleaning and maintenance.
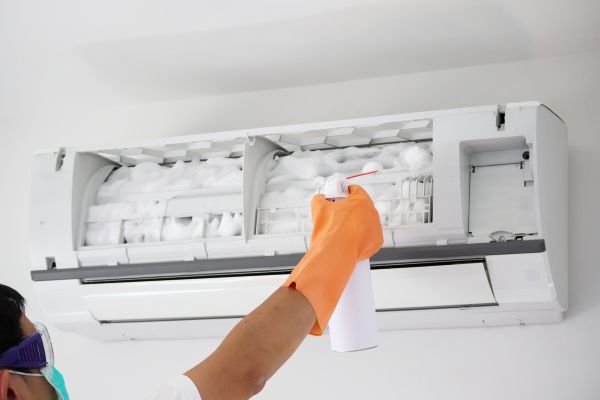
4. Use a Cleaner Designed Specifically for HVAC
There are several products that are designed specifically for cleaning AC coils, such as this coil cleanser from Home Depot. Spray it onto the coils and allow it to expand into a foam, then leave it for about 10 minutes so that it can dissolve the dirt and grime that has accumulated on the coils. Then carefully wipe it off with a cloth, taking care not to damage the aluminum fins used to facilitate heat transfer in the system.
5. Rinse Everything Off
The next step is to rinse all the foam residue off the coils. For the outdoor unit, you can do this with a hose, while a wet cloth should serve just fine for the indoor element. Allow the coils to dry before you move on to the next step.
6. Reassemble the System
Put everything back into place carefully, taking care not to knock any wires loose. Place the casing back where it belongs, and screw it back on, once again being careful not to damage the fins inside the system.
7. Switch It All Back On!
Once your system is clean and dry, and everything has been properly returned to its original position, turn the system back on and let it run for a while to test it out. If you’ve followed all the steps, your system should operate more efficiently than it did before you cleaned it, and over time, you should notice a drop in your energy bill and a marked improvement in the building’s air quality.
If, after carefully following each of the steps in this guide, you are still experiencing reduced efficiency of your system, then it’s possible that a more thorough professional cleaning or a repair is necessary. Contact a reputable professional HVAC company, like All Weather Heating & Cooling in Ohio, to perform an inspection and return your AC unit to peak operation.
Disclaimer: This story is auto-aggregated by a computer program and has not been created or edited by Worldtravelers.
Publisher: Source link
Publisher: Source link


Latest Posts
-
 31 July 2025
 -
 26 July 2025
 -
 14 July 2025
 -
 01 July 2025
 -
 07 August 2025
 -
 29 July 2025
 -
 20 February 2025
 -
 04 February 2025
Get The Best Blog Stories into Your icountox!
Sign up for free and be the first to get notified about new posts.